CVE-2025-67736 FreePBX Authenticated SQL Injection leads to RCE
Overview This will be fairly straight to the point since it’s another FreePBX vulnerability. It’s an authenticated SQLi, so not the end of the world as you’d...
When I was starting out in penetration testing, it always confused me how folks would say they worked using a simple CLI only linux machine in a VPS. I understood they did it in order to test from an IP that wasn’t their home IP to avoid getting their home IP blocked by the target they were testing against, but I couldn’t understand how they still used tools like Burp Suite, or a simple web browser. The answer was usually “tunnels”, but that didn’t quite click for me; I kind of need to see a working setup to make sense of it. I just kind of assumed you needed some sort of remote desktop setup.
You don’t need a full remote desktop setup! You can do it all via ssh through a very small remote linux server!
I plan on covering my usual testing setup for bug bounty using a local testing machine and then a CLI only remote machine, which will have the IP address I want my “attack traffic” to originate from; this is typically some sort of cloud hosted VPS.
Start burp, set Burp SOCKS proxy to 127.0.0.1:1080.
Set up SSH tunnels:
$ ssh -R 127.0.0.1:8765:127.0.0.1:8080 -D 127.0.0.1:1080 <username>@<cli-host>
Host <cli-host>
  Hostname <cli-hostname-or-ip>
  RemoteForward 127.0.0.1:8765 127.0.0.1:8080
  DynamicForward 127.0.0.1:1080
  LogLevel FATAL
I set up a small lab environment with a few Virtual Machines (VM) that will resemble a common setup during a penetration test/bug bounty/etc engagement.
| Hostname | IP Address | Description |
| :—: | :—————: | :——-: |
|ubuntu-target-vm|192.168.122.30 | This machine should simulate a target you intend to test. index.php will return your current IP address IE $_SERVER['REMOTE_ADDR']|
|ubuntu-cli-attack-vm|192.168.122.151 | This machine should simulate a CLI-only linux instance you spin up remotely IE EC2/Droplet/etc from which you want your traffic to originate from.|
|ubuntu-local-attack-vm|192.168.122.118 | This machine should simulate a local testing machine where you have your GUI tools installed and primarily work from IE your laptop/desktop/etc.|
For ubuntu-target-vm, this is my testing setup to return the IP address of ubuntu-target-vm along with the IP address of the request traffic:
root@ubuntu-target-vm:~/testwebserver# cat index.php
<?php
echo "Hello from {$_SERVER['SERVER_NAME']}\n";
echo "Your request came from IP Address: {$_SERVER['REMOTE_ADDR']}\n";
?>
root@ubuntu-target-vm:~/testwebserver# php -S 192.168.122.30:80
[Mon Sep 22 15:03:48 2025] PHP 8.3.6 Development Server (http://192.168.122.30:80) started
And when I make a curl request from my CLI only machine ubuntu-cli-attack-vm, we can see it returns the correct originating IP address 192.168.122.151:
they@ubuntu-cli-attack-vm:~$ curl -sk 192.168.122.30/index.php
Hello from 192.168.122.30
Your request came from IP Address: 192.168.122.151
I have also added an ssh key I generated on ubuntu-local-attack-vm and added to ~/.ssh/authorized_keys on ubuntu-cli-attack-vm:
they@ubuntu-local-attack-vm:~$ ssh-keygen -a 100 -t ed25519
Generating public/private ed25519 key pair.
Enter file in which to save the key (/home/they/.ssh/id_ed25519):
...Omitted for brevity
+----[SHA256]-----+
they@ubuntu-local-attack-vm:~$ cat .ssh/id_ed25519.pub
ssh-ed25519 AAAAC3NzaC1lZDI1NTE5AAAAIHvRmIJNJWRAjdnN7NjaE3OVjqgXwIP0+LXJdZJItb33 they@ubuntu-local-attack-vm
Then on ubuntu-cli-attack-vm:
they@ubuntu-cli-attack-vm:~$ echo 'ssh-ed25519 AAAAC3NzaC1lZDI1NTE5AAAAIHvRmIJNJWRAjdnN7NjaE3OVjqgXwIP0+LXJdZJItb33' >> ~/.ssh/authorized_keys
This simply alleviates the need to enter a password for every ssh connection to ubuntu-cli-attack-vm from ubuntu-local-attack-vm.
When I test on this setup, I’m looking to:
All of this work will be done through a single SSH connection, and we will leverage two tunnels inside of that connection to transport data from ubuntu-cli-attack-vm to ubuntu-local-attack-vm, and then from ubuntu-local-attack-vm back to ubuntu-cli-attack-vm and onto the target ubuntu-target-vm.
Establish an SSH connection to ubuntu-cli-attack-vm from ubuntu-local-attack-vm and set up the following two tunnels:
8765 on the 127.0.0.1/localhost interface on ubuntu-cli-attack-vm (I’m using port 8765 here to remove ambiguity, but I typically use 8080 on both sides of the tunnel in practice)8080 on the 127.0.0.1/localhost interface on ubuntu-local-attack-vm
1080 on ubuntu-local-attack-vmubuntu-cli-attack-vm (this doesn’t forward to a specific port, instead it sends the traffic on to it’s intended destination from ubuntu-cli-attack-vm)There are three ways you can accomplish each of these:
-R [2] and -D [3]~/.ssh/config file [4]~C escape sequence [5]
Ultimately, we will end up with a setup like the following diagram illustrates: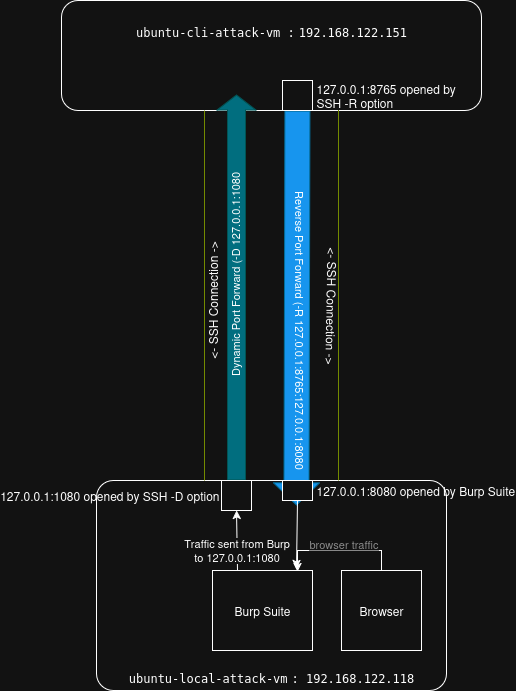
This tunnel will open a port (8765) on the remote machine, ubuntu-cli-attack-vm, on the specified interface and then forward all packets sent to that port through the SSH connection to the specified port (8080) on our local machine ubuntu-local-attack-vm. The objective of this tunnel is to be able to run commands on the remote machine and forward the traffic through Burp Suite if we would like to.
The example SSH command to do this alone would be:
$ ssh -R 127.0.0.1:8765:127.0.0.1:8080 they@192.168.122.151
And if we run that command and then execute ss -tulpn, we can see port 8765 open:
they@ubuntu-local-attack-vm:~$ ssh -R 127.0.0.1:8765:127.0.0.1:8080 they@192.168.122.151
Welcome to Ubuntu 24.04.3 LTS (GNU/Linux 6.8.0-83-generic x86_64)
...Omitted...
they@ubuntu-cli-attack-vm:~$ ss -tulpn
Netid   State    Recv-Q   Send-Q              Local Address:Port     Peer Address:Port   Process
udp     UNCONN   0        0                      127.0.0.54:53            0.0.0.0:*
udp     UNCONN   0        0                   127.0.0.53%lo:53            0.0.0.0:*
udp     UNCONN   0        0          192.168.122.151%enp1s0:68            0.0.0.0:*
tcp     LISTEN   0        128                     127.0.0.1:8765          0.0.0.0:*
tcp     LISTEN   0        4096                      0.0.0.0:22            0.0.0.0:*
tcp     LISTEN   0        4096                127.0.0.53%lo:53            0.0.0.0:*
tcp     LISTEN   0        4096                   127.0.0.54:53            0.0.0.0:*
tcp     LISTEN   0        4096                         [::]:22               [::]:*
Since you may not want to have to add this option to ssh every time you connect to the machine, you can have this tunnel automatically established using the ~/.ssh/config file by adding the following option to your local ~/.ssh/config file:
Host ubuntu-cli-attack-vm 192.168.122.151
  Hostname 192.168.122.151
  RemoteForward 127.0.0.1:8765 127.0.0.1:8080
Finally, using the ~C escape sequence, You can use R 127.0.0.1:8765:127.0.0.1:8080:
$ ssh -o EnableEscapeCommandline=yes they@192.168.122.151
Welcome to Ubuntu 24.04.3 LTS (GNU/Linux 6.8.0-83-generic x86_64)
...Omitted...
See "man sudo_root" for details.

they@ubuntu-cli-attack-vm:~$ ss -tulpn
Netid   State    Recv-Q   Send-Q              Local Address:Port     Peer Address:Port   Process
udp     UNCONN   0        0                      127.0.0.54:53            0.0.0.0:*
udp     UNCONN   0        0                   127.0.0.53%lo:53            0.0.0.0:*
udp     UNCONN   0        0          192.168.122.151%enp1s0:68            0.0.0.0:*
tcp     LISTEN   0        4096                      0.0.0.0:22            0.0.0.0:*
tcp     LISTEN   0        4096                127.0.0.53%lo:53            0.0.0.0:*
tcp     LISTEN   0        4096                   127.0.0.54:53            0.0.0.0:*
tcp     LISTEN   0        4096                         [::]:22               [::]:*
they@ubuntu-cli-attack-vm:~$
ssh> R 127.0.0.1:8765:127.0.0.1:8080
Forwarding port.

they@ubuntu-cli-attack-vm:~$ ss -tulpn
Netid   State    Recv-Q   Send-Q              Local Address:Port     Peer Address:Port   Process
udp     UNCONN   0        0                      127.0.0.54:53            0.0.0.0:*
udp     UNCONN   0        0                   127.0.0.53%lo:53            0.0.0.0:*
udp     UNCONN   0        0          192.168.122.151%enp1s0:68            0.0.0.0:*
tcp     LISTEN   0        128                     127.0.0.1:8765          0.0.0.0:*
tcp     LISTEN   0        4096                      0.0.0.0:22            0.0.0.0:*
tcp     LISTEN   0        4096                127.0.0.53%lo:53            0.0.0.0:*
tcp     LISTEN   0        4096                   127.0.0.54:53            0.0.0.0:*
tcp     LISTEN   0        4096                         [::]:22               [::]:*
You need a completely clear command line, so Ctrl+c or hit enter with an empty command line to clear the input buffer, then type ~C note the capital C.
You may also need to enable the command line with -o EnableEscapeCommandline=yes. This can also be added to the ~/.ssh/config file so it is always enabled.
If you ever forget the syntax, type a ? in the ssh> prompt to get a list of options:
they@ubuntu-cli-attack-vm:~$
ssh> ?
Commands:
      -L[bind_address:]port:host:hostport    Request local forward
      -R[bind_address:]port:host:hostport    Request remote forward
      -D[bind_address:]port                  Request dynamic forward
      -KL[bind_address:]port                 Cancel local forward
      -KR[bind_address:]port                 Cancel remote forward
      -KD[bind_address:]port                 Cancel dynamic forward
This tunnel will open a port (1080) on our local machine ubuntu-local-attack-vm and then forward any SOCKS traffic sent to that port through the SSH tunnel and egress ubuntu-cli-attack-vm to the target.
The command to establish a Dynamic port forward would be:
they@ubuntu-local-attack-vm:~$ ssh -D 127.0.0.1:1080 they@192.168.122.151
Once the connection is established, switch to a separate terminal to observe the port is open
they@ubuntu-local-attack-vm:~$ ss -tulpn
Netid State  Recv-Q Send-Q Local Address:Port    Peer Address:Port Process
udp   UNCONN 0      0            0.0.0.0:52037        0.0.0.0:*
udp   UNCONN 0      0            0.0.0.0:5353         0.0.0.0:*
udp   UNCONN 0      0         127.0.0.54:53           0.0.0.0:*
udp   UNCONN 0      0      127.0.0.53%lo:53           0.0.0.0:*
udp   UNCONN 0      0               [::]:5353            [::]:*
udp   UNCONN 0      0               [::]:53257           [::]:*
tcp   LISTEN 0      4096   127.0.0.53%lo:53           0.0.0.0:*
tcp   LISTEN 0      128        127.0.0.1:1080         0.0.0.0:*     users:(("ssh",pid=10855,fd=4))
tcp   LISTEN 0      4096      127.0.0.54:53           0.0.0.0:*
tcp   LISTEN 0      4096       127.0.0.1:631          0.0.0.0:*
tcp   LISTEN 0      4096           [::1]:631             [::]:*
And then leverage a command such as curl to confirm traffic is egressing ubuntu-cli-attack-vm
they@ubuntu-local-attack-vm:~$ curl -s 192.168.122.30/index.php
Hello from 192.168.122.30
Your request came from IP Address: 192.168.122.118
they@ubuntu-local-attack-vm:~$ curl -s 192.168.122.30/index.php --proxy socks5://127.0.0.1:1080
Hello from 192.168.122.30
Your request came from IP Address: 192.168.122.151
Notice the IP address changed once the --proxy option is added
The DynamicForward option inside the ~/.ssh/config file to establish a Dynamic Port Forward automatically upon establishing an SSH connection to the host:
Host ubuntu-cli-attack-vm 192.168.122.151
  Hostname 192.168.122.151
  DynamicForward 127.0.0.1:1080
Finally, using the ~C escape sequence, You can use D 127.0.0.1:1080:
they@ubuntu-local-attack-vm:~$ ssh -o EnableEscapeCommandline=yes they@192.168.122.151
...Omitted...
they@ubuntu-cli-attack-vm:~$
ssh> D 127.0.0.1:1080
Forwarding port.
The ssh command to establish both tunnels would be:
$ ssh -R 127.0.0.1:8765:127.0.0.1:8080 -D 127.0.0.1:1080 they@192.168.122.151
I recommend using ~/.ssh/config to set both of these up, along with silencing some of the error logging messages via setting LogLevel [6] to FATAL:
Host ubuntu-cli-attack-vm 192.168.122.151
  Hostname 192.168.122.151
  RemoteForward 127.0.0.1:8765 127.0.0.1:8080
  DynamicForward 127.0.0.1:1080
  LogLevel FATAL
For the purposes of this walkthrough, we will presume Burp Suite is listening on the default port 127.0.0.1:8080.
There is only one setting you need to configure after setting up your SSH tunnels using the above guide, and that is configuring Burp Suite to send outgoing traffic to a SOCKS proxy. After opening Burp, navigate to Proxy -> Proxy settings -> Network -> Connections -> SOCKS proxy and set the following:
SOCKS proxy host: -> 127.0.0.1SOCKS proxy port: -> 1080 (or whichever port you choose via the Dynamic Port Forward option in ssh)
Then check the Use SOCKS proxy box.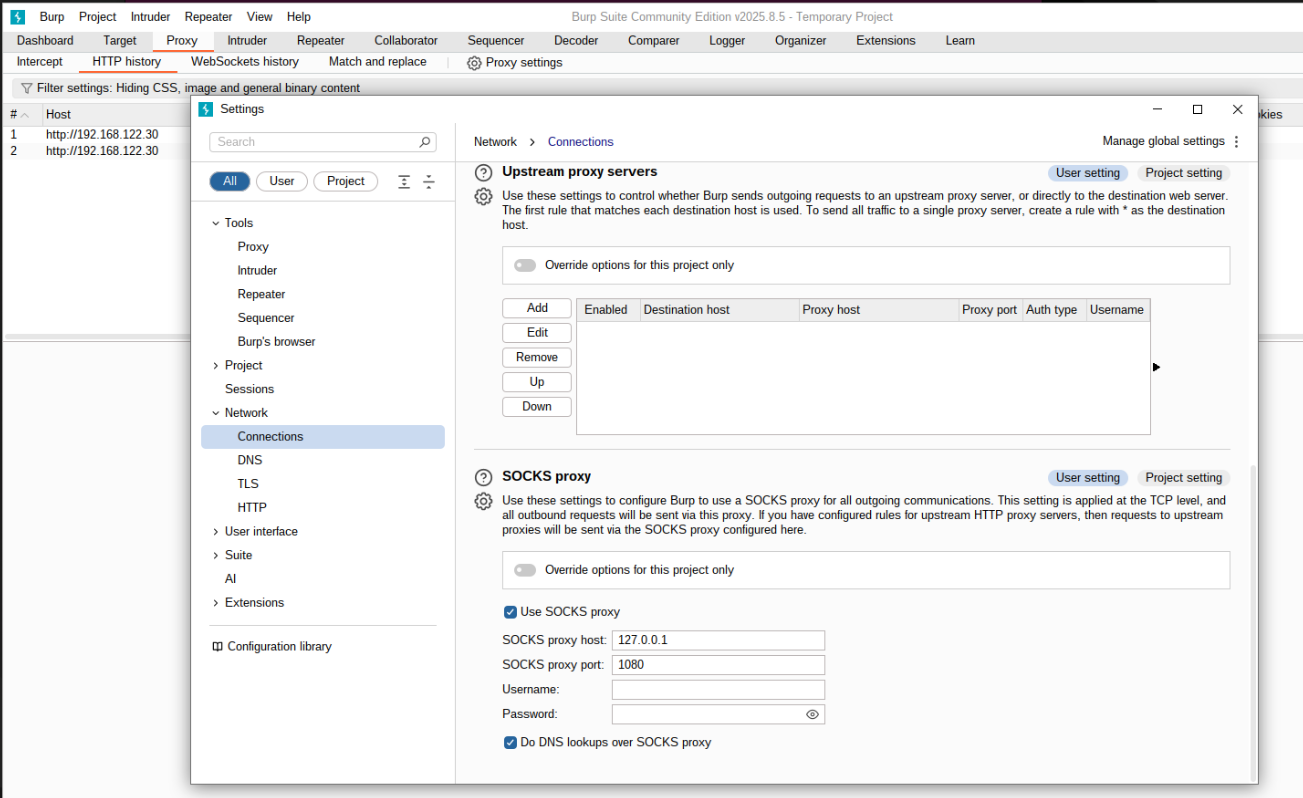
I choose to set up the ~/.ssh/config file, but no matter the method, you end up with a setup where you can easily run commands from your remote attack machine ubuntu-cli-attack-vm, proxy them through Burp using the newly created listener on 127.0.0.1:8765, view the request in Burp proxy, and still have the request egress from ubuntu-cli-attack-vm as Burp forwards all traffic through the SOCKS proxy created on 127.0.0.1:1080 on ubuntu-local-attack-vm.
they@ubuntu-local-attack-vm:~$ cat .ssh/config
Host ubuntu-cli-attack-vm 192.168.122.151
  Hostname 192.168.122.151
  RemoteForward 127.0.0.1:8765 127.0.0.1:8080
  DynamicForward 127.0.0.1:1080
  LogLevel FATAL
they@ubuntu-local-attack-vm:~$ ssh they@192.168.122.151
Welcome to Ubuntu 24.04.3 LTS (GNU/Linux 6.8.0-83-generic x86_64)
...Omitted...
they@ubuntu-cli-attack-vm:~$ curl -s 192.168.122.30/index.php --proxy http://127.0.0.1:8765
Hello from 192.168.122.30
Your request came from IP Address: 192.168.122.151
And we can observe the request in Burp:
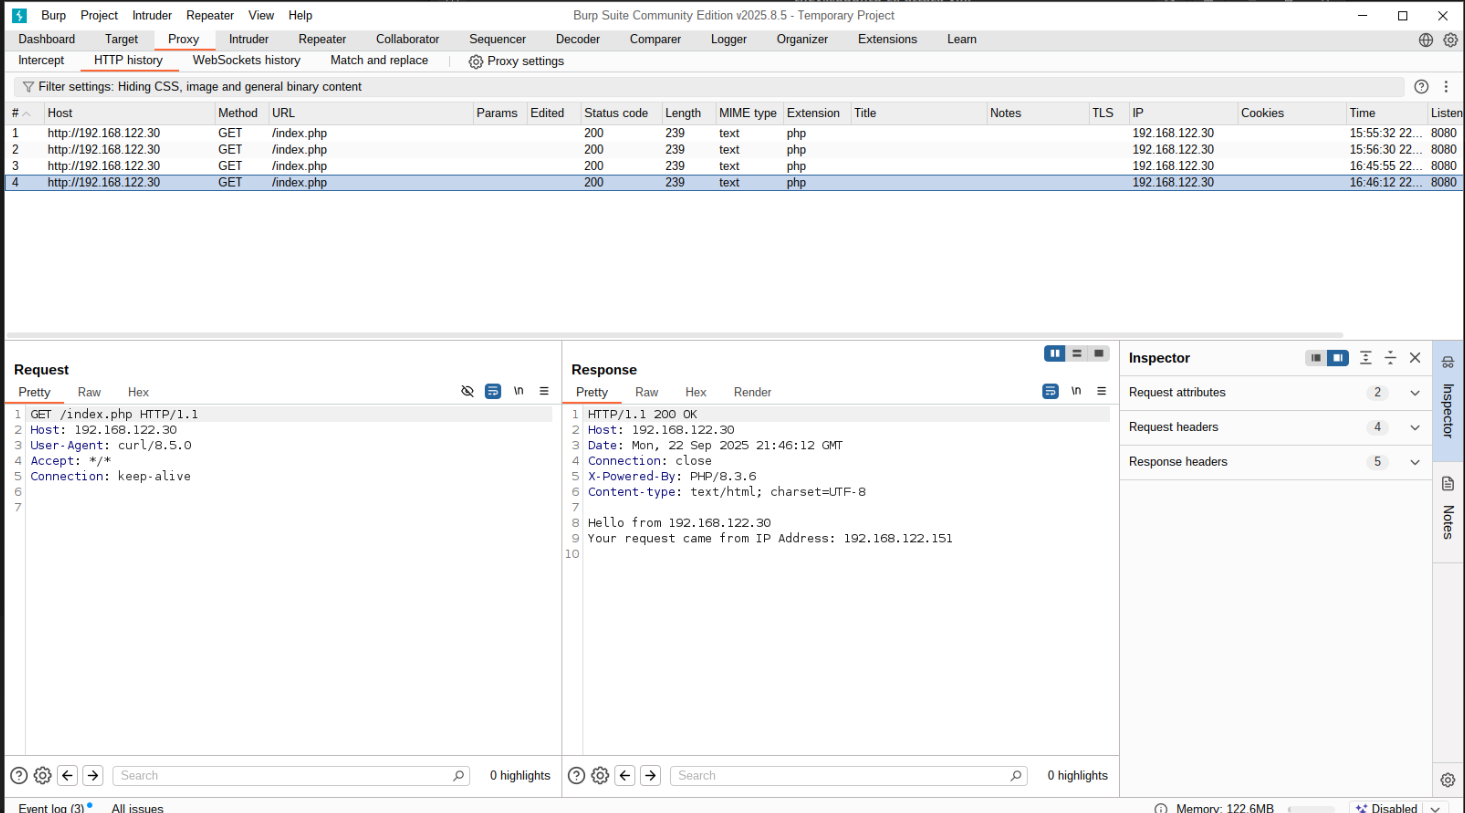
as well as the response showing the traffic is still arriving at the target ubuntu-target-vm from ubuntu-cli-attack-vm IP 192.168.122.151. We can now use Burp via browser, or run any tools (httpx, nuclei, sqlmap, metasploit, etc) on our ubuntu-cli-attack-vm and ensure traffic goes through Burp and originates from ubuntu-cli-attack-vm.
Bonus, you can also freely use the SOCKS proxy on ubuntu-local-attack-vm with any tools that support SOCKS. An example from above:
they@ubuntu-local-attack-vm:~$ curl -s 192.168.122.30/index.php
Hello from 192.168.122.30
Your request came from IP Address: 192.168.122.118
they@ubuntu-local-attack-vm:~$ curl -s 192.168.122.30/index.php --proxy socks5://127.0.0.1:1080
Hello from 192.168.122.30
Your request came from IP Address: 192.168.122.151
So any tools installed locally can be used leveraging their respective proxy options. A bonus piece of information: if you try and access a target by hostname vs IP, use the socks5h:// option.
https://en.wikipedia.org/wiki/SOCKSssh -R manpage: https://man.openbsd.org/ssh#R~5ssh -D manpage: https://man.openbsd.org/ssh#Dssh_config manpage: https://man.openbsd.org/ssh_configssh escape sequence manpage: https://man.openbsd.org/ssh#_COverview This will be fairly straight to the point since it’s another FreePBX vulnerability. It’s an authenticated SQLi, so not the end of the world as you’d...
Overview When I was starting out in penetration testing, it always confused me how folks would say they worked using a simple CLI only linux machine in a VPS...
Overview I recently noticed quite a few folks recently looked at Nagios XI. Some even pulled the obfuscated stuff apart which I thought was really awesome! I...
CVE-2021-42840 This one will be a bit short, since severity/impact/video/etc is all identical to my post on the previous SuiteCRM RCE.
Path traversal in File Upload leads to Remote Code Execution in Chamilo LMS Overview It’s been a bit since I spent some time looking for a web vuln… And this...
tldr/oneliner ruby -e '"".class.ancestors[3].system("cat /etc/passwd")' Why? So I was doing a bit of reading on SSTI, specifically that of Jinja/python which...
Remediation testing I found another vulnerability during remediation testing, and that writeup can be found here.
TL;DR Just go to the Demo Or, just go to the Demo Round 2 for reverse tunneling Accessing Resources Behind Multiple Resources At some point, you may run into...
How to get a Shell on your Router (hopefully) Vulnerability hunting is hard, and it’s even harder if you don’t have access to the source. Hardware devices ma...